
Writer: Mark Brody
Tasteful application of reverb on vocals can make the difference between a good mix and a great mix, no matter what style of music you’re producing. And when it comes time to fine-tune your lead vocals to perfection, your DAW software can offer you so many reverb options that you may not know where to start. While there are no hard and fast rules in music production, there are definitely some tips and techniques you can apply that will help you achieve the polished vocal sound you’re looking for. Knowing how to use reverb on vocals can give you a real edge. Let’s take a look at 10 reverb tips that will put you on the fast track to stellar-sounding vocals.
Secret #1- Record dry and add reverb in the mix
Many vocalists will prefer to hear some “comfort reverb” on their voice as they’re recording, and it can lead to a much better performance than if they were only monitoring their dry vocals. That being said, you’ll want to record the vocals dry without any added reverb, to maintain full sonic control during mixdown. Like any other element in your music, reverb needs to be balanced with everything else in the mix, and you’ll be greatly limiting your options if you record your vocals with reverb. Many modern audio interfaces and most DAW software allow you to add comfort reverb to a vocalist’s monitor mix, and you should definitely do that if the artist asks for it — just make sure you’re only recording the dry vocals.
Secret #2- Use an Aux Send for more control
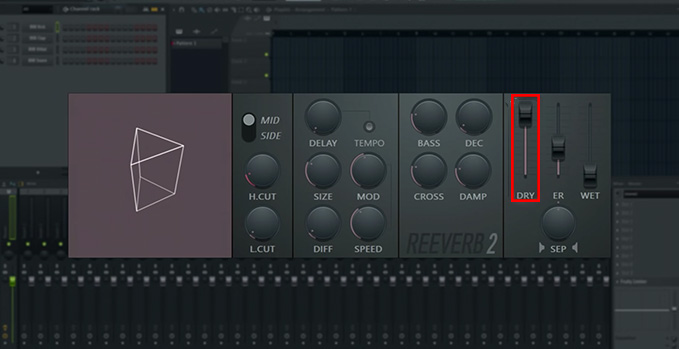
Assuming you’re using a reverb plug-in (as opposed to a hardware effects processor), you have two options for applying it to your vocal track — either add it as an insert effect in the vocal channel strip, or place it on an aux channel fed by a send from your vocal channel. To give yourself maximum creative control over your mix, you’ll want to put your vocal reverb on an aux track. Once you’ve created your reverb channel, send your vocal channel to it at unity gain (0dB on the send control), and use the reverb channel’s fader to control its volume in the mix (don’t forget to set your reverb plug-in to 100% wet output). By dedicating an aux channel to your vocal reverb, you have the ability to add additional plug-ins to shape your reverb further, and you’ll have more efficient control over the reverb volume via its channel fader.
Secret #3- EQ your vocal reverb
Even relatively short reverb tails can quickly cloud your mix if you aren’t careful with them. Excessive low-frequency content will reduce the perceived impact from bass and drums. Too much high frequency content can sound unnatural, and also diminish the detail you hear in other mix elements. Adding an EQ plug-in after your reverb plug-in gives you full control over how your vocal reverb sits in the mix, and you may be surprised at how much frequency content you can carve away while still maintaining the amount of ambience you’re going for. Many reverb plug-ins offer a built-in equalizer for exactly this reason.

Pro Tip: Start by reducing or eliminating everything below 200-300Hz, and you’ll likely hear your mix open up without any noticeable loss of the reverb effect, this is one of my favorite insider tricks on how to use reverb on vocals correctly.
Secret #4- Use pre-delay to create a sense of distance
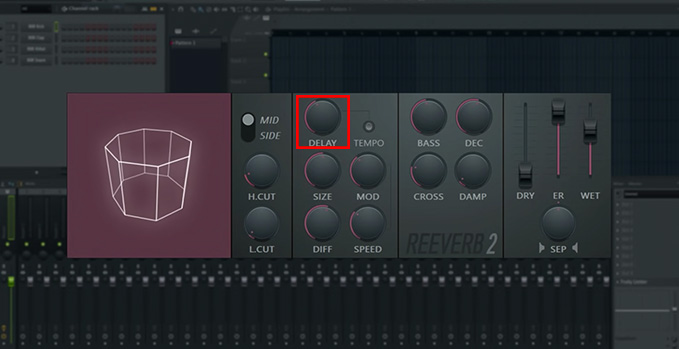
One of the most impactful controls you’ll find on a reverb effect is pre-delay, which allows you to create a short delay before the first early reflections of the reverb begin. This short delay (usually under 20 milliseconds) plays a big role in how we perceive the mix. With no pre-delay, your vocals will sound farther away in the mix, regardless of the channel volume. This could be ideal for background vocals, and other mix elements that need to sit towards the back of the soundstage. But if you find your lead vocals aren’t sitting as forward in your mix as you would like, try increasing the pre-delay amount. As you increase pre-delay, you’ll hear the lead vocal gain distinction and clarity, without altering the character of the vocal reverb itself. Too much pre-delay can begin to sound like an echo, so you definitely want to use your ears and find the best balance for your particular mix.
Secret #5- Experiment with reverb length and volume for more musicality
When you are shaping your mix and deciding how much reverb to use on vocals, consider two specific elements — how long the reverb tail is, and the volume of the reverb channel itself. While long, spacious reverb tails sound good when auditioning different reverb types, excessively long tails rarely sit well in a busy mix. Try setting the reverb length as short as possible, then gradually increase it as you listen to the mix. You’re looking for the point that the reverb adds richness and width to the vocal sound, but doesn’t begin to get cloudy and indistinct. Some reverb plug-ins can even sync the reverb tail to your project’s BPM, allowing you to control it in musically-relevant amounts, such as a quarter note or whole note.
As far as the reverbs overall volume, a good place to start is to bring the reverb channel’s fader up until the reverb effect is just barely perceptible. A common rule of thumb is that you should miss the reverb when you mute the reverb channel, but that it’s barely perceived when un-muted. Remember that your mix will likely be compressed after this point, at least during mastering and likely again during digital distribution. Compression will accentuate the reverb effect, so don’t go too heavy on it during the mixdown stage (unless that’s the effect you’re going for!).
Secret #6- Consider using delay instead of reverb to create space
If you’re working with a busy mix and having trouble adding reverb to your vocals without clouding everything up, consider using a short delay trail instead of reverb. By adding a stereo delay with just a couple of short repeats, you can achieve the sense of space and width that you desire while leaving much more sonic space for other mix elements. If that leaves your overall vocal tone too dry, try adding the delay to your reverb channel after the reverb plug-in. A very short reverb tail fed into a short delay line can create a sense of ambience that still leaves more space in your mix than a long reverb tail would.
Secret # 7 – Vary vocal reverb by song section for added musical impact
Instead of trying to create a reverb effect that will sound suitable throughout your entire mix, consider creating a few different aux channels with different reverbs, and automate your vocal channel sends to them. A common technique for professional mix engineers is to set up three reverb channels with short, medium, and long reverb tails. Send your main vocals to the shortest reverb for busier song sections, to the medium reverb for sections that build up or climax, and save the longest reverb for vocal throws or to highlight specific words or phrases. By automating your reverb sends differently for each song section, you can not only add dynamic sonic interest to your mix, you can also tailor each reverb to sit well with whatever else is going on in the mix at that time.
Secret #8 – Use stereo reverbs for sonic complexity
Instead of using a single reverb plug-in with a stereo output, you can achieve an even greater sense of space and separation by utilizing two stereo reverbs panned hard left and right. Instead of creating a single stereo aux track for your reverb plug-in, create two stereo aux tracks (with the same reverb plug-in inserted on both) and pan them opposite each other (you can also experiment with less extreme panning to hear what the overlap sounds like). Copy the settings from your “left” reverb plugin to the “right” reverb plug-in, then make some minor adjustments to the settings (add a couple milliseconds of reverb decay and a millisecond of pre-delay to one reverb plug-in, for instance). Send your vocal channel to both reverb channels equally, and consider grouping the reverb channels for easier control over their channel faders. The slight differences in the reverb settings will create a richer stereo effect than you would normally achieve with a single stereo reverb plug-in. This technique can be especially pleasing in a sparse mix where the vocals have a lot of sonic space to fill.
Secret # 9- Make vocal reverb decisions in the context of your mix, not soloed
It’s natural to want to fine-tune your vocal reverb effects with your vocal channel soloed, but that would be a mistake. Just as with equalization, you need to hear how your reverb is sitting in the context of your mix to make informed decisions. If you spend too much time perfecting your reverb sound in isolation, you may find your entire mix is unbalanced when you bring the other elements back in. Dial in your vocal reverb in the context of the entire mix, balancing things like reverb length and pre-delay against the other sounds in your mix, and you’ll able to find the right balance and tone much faster than if you were working in isolation.
Secret #10- Beware of natural reverb from your room
So far we’ve focused on adding reverb on vocals as an effect during mixdown, but the reality is that you’re capturing a bit of natural room reverb in your vocal recordings too. Depending on the size and shape of your room, this can color your vocal recordings, potentially diminishing their clarity and detail. While placing acoustic treatment on the walls and ceilings of your recording space is crucial, you can also benefit greatly by placing foam panels or heavy blankets directly behind the microphone as well as behind the vocalist. With treatment behind the microphone you’ll reduce some of the sound pressure being sent into the room, lowering the overall sonic energy in the room. And with some treatment behind the vocalist, you’ll be catching some reflected sound that would otherwise make it back to the vocal microphone. It’s easy to set up some absorption for any vocalist — even a heavy blanket draped over a mic stand at head height will help control room reverb.

Pro Tip– There are several excellent portable recording booths available today. One of our favorites is the sE Electronics Reflexion Filter RF-X, see it HERE and see other options HERE.
Start Using Reverb on Vocals Correctly
These tips should help you efficiently apply vocal reverb effects to practically any style of music. While there is seemingly endless variety in the types of reverb plug-ins available, as well as the specific flavors of reverb they offer, the general guidelines we covered in this article will help you achieve better vocal reverb effects regardless of what’s in your toolkit.


